Friday 30 August 2024

How to generate Originator for outlook actionable message adaptive card?

Recently I was working on Power Automate flow to notify users. We generally use HTML template to send the notification. This time I thought to implement something different and tried to create Adaptive card to send notification. You can generate sample adaptive card using below site:

It is json code that will be rendered in design way by Microsoft apps (like teams, Outlook etc.).

Note – This will not work with other cloud emails like Gmail. 

Issue:

When I tried it for my user, it worked well. But when I send the email to a colleague, to see how it renders on their end, it was not showing. The Emails are showcasing blank card. The same code was working for teams. It was rendered correctly.

Analysis:

When I searched for the issue on web, I found out that when we use adaptive card with Outlook, it requires special header called Originator. This header is not required in the Teams message. So, now the question was how to generate Originator?

Solution:

We need to follow below steps to generate Originator:

  1. Go to below link:
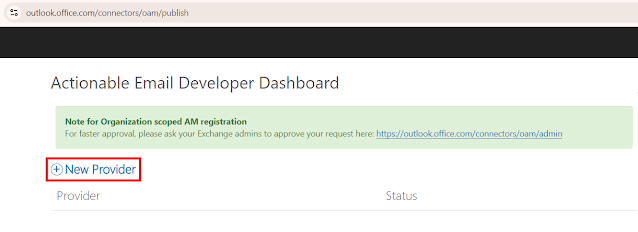
    URL - https://outlook.office.com/connectors/oam/publish
  2. Click New Provider.

  3. This will open form to fill details. 
    • New Provider
      • Friendly Name – Provide name for your connection.
      • Provider ID (Originator) – Copy this ID. We will need this for sending the outlook adaptive card.
      • Sender Email Address – Provide email address from which the adaptive card will be sent. 
      • Target URLs – Provide URL where the response will be received. Please set up using Power Automate or any API which will process the response. 
      • Public Key (Optional) – Provide RSA key for encryption.
      • Logo (Optional) – Provide logo for your card request. 
            

    • Scope of Submission – This has 3 different values and based on selection there will be additional information will be asked.
      • Test Users – Select this if you are testing the functionality and want to send the card for review to specific users. Once selected You will see textbox below to provide test user email address with “;” (semicolon) separated.

        This is auto approved.  


      • Organization – If your card is ready and want to publish this functionality for your organization, select this option. Once selected, you will need to provide additional email who will be notified and comment why you are setting this up.

        This will send the notification to your exchange admin for approval and after approval it will take approx. 24 hours to rollout the changes.

        Outlook admin can approve the request on below link: https://outlook.office.com/connectors/oam/admin

        We will set up this in this blog. 


      • Global – If you want the functionality to be deployed over multiple tenants or want to make it publicly available, please select this option. Once selected, you need to provide your contact information, your company details, scenario for your adaptive card, your adaptive card code and screenshots of your cards and its option.

        This will be sent to Microsoft for approval, and it will take approx. 2 weeks for rollout after Microsoft approves your request. 

    • Accept the terms and condition. 
    • Click save.

As mentioned earlier, we are setting up this for organization. So, I have selected second option and saved the changes. It then submits the request on the page and you will see pending request status.


Now, we need to ask the exchange admin to review the request and approve it.
URL - https://outlook.office.com/connectors/oam/admin

  1. When you open this, you can see all the pending approvals.


  2. Click on Provider.
  3. It will open the submitted request with approve & reject button.


  4. Click approve and provide any additional comment if you needed. 


  5. After this you can use the Provider ID (Originator) that we have copied in the step 3 while creating the Provider.


In the next blog we will see how to send the adaptive card with outlook and power automate and where to use the Originator. 

Reference: 

  1. https://learn.microsoft.com/en-us/outlook/actionable-messages/adaptive-card#outlook-specific-adaptive-card-properties-and-features
  2. https://poszytek.eu/en/microsoft-en/office-365-en/powerautomate-en/adaptive-cards-in-outlook-ultimate-guide/


Wednesday 10 July 2024

Retirement of Office 365 E3 developer subscription

 Recently I received error message in my mobile's outlook saying that there is issue connecting my E3 developer account. I thought due to password change it might occur. But when I tried to login in the browser, it showed same error. Then I rushed to check in my outlook email that was connected with the developer program to find out if I got any notice for the subscription renewal. Generally, I got message for renewal and I used it for some POC and it was auto renewed. But this time the message was bit different. It states like below:

We noticed that you have an active Office 365 E3 developer subscription through your membership in the Microsoft 365 Developer Program.

The Microsoft 365 Developer Program no longer supports the Office 365 E3 developer offering, and your existing subscription will no longer be renewed after April 3, 2024. Please check out the Microsoft 365 Developer Program dashboard to see the expiration dates for your E3 subscription.

Wednesday 21 February 2024

'create-react-app' is not recognized as an internal or external command

Issue:

Recently there was an issue we face while training React. Generally we give training using video series on YouTube but this time we pass on training blog from c-sharp corner learn module. The installation process showcase we need to install node js and then run command "create-react-app" to create react app. But it gave us below error:

Error - 'create-react-app' is not recognized as an internal or external command.


Analysis:

The command was the correct one and we generally use that. So the issue has to be something with the environment. When I checked the resolution for this in google, it suggested to use "npx" before the command. When we use that, it created the react app. So, I checked the git repository for the explanation of this.


Resolution:

So, the issue we face was due to node version installed. As per the git repository, if you have node version 5.1 or higher, you need to add "npx" before the command. if the version is lover, you can directly use the command to create the app. 

I am trying to reach the author to include this as note in the post. As comments is not allowed in the post, I am writing this blog to help someone if they face the same issue. 


Reference:

  • https://www.c-sharpcorner.com/learn/reactjs-for-beginners/introduction-to-react-js
  • https://gist.github.com/gaearon/4064d3c23a77c74a3614c498a8bb1c5f

Monday 19 February 2024

PowerShell - Cannot convert the value of type "System.String" to type "System.Security.SecureString"

Issue:

Recently, my colleague was working on a migration project. He faced a really strange issue with 

PowerShell. We have created that script for big site migration and we have done tons of site migration with that in the past. But this time it was throwing an error while we were trying to connect the site. Below is the sample code portion:

 #Prompt the user for the source environment username  
 $sourceUserName = "domain\username"  
 # Prompt the user for the source environment password  
 $password = 'My&$P@ssw0rd'  
 $securePassword = $password | ConvertTo-SecureString -AsPlainText -Force  
 Connect-Site "Site URL" -Username $sourceUserName -Password $securePassword  

Error - Connect-Site : Cannot bind parameter 'Password'. Cannot convert the value of type "System.String" to type "System.Security.SecureString". At line:1 char:131


Analysis:

The first thing I checked on my end was whether there was any change in the "connect-site" command. But there was no update there. So, we try to run the connect-site command without passing a password. Powershell showcased the dialog for the password and it worked like a charm. That means the password was also correct. But we were not able to pass it correctly. 

Generally, when we get any projects, we used to set our passwords but this time it was set by the client and it contained many special characters. In the above code, we have showcased 2 of them - & and $. These 2 characters are not handled when you try to treat them normally in convert to secure string. 


Resolution:

So, we copy the error and google it. But there were tons of sites. So, we go to the copilot in the edge browser and ask resolution of the same error. It provided a response with possible resolutions and the source sites list where it has gathered the information. The response was correct but still I went through the reference site. I found one stack overflow site which I mentioned in reference that explained things in much easier language than copilot. 

The PowerShell herestring exists for just such an occasion.

 $password = @'  
 My&$P@ssw0rd  
 '@  

The @" and "@ characters have to be on their own line, but allow for any characters inside of them.

Once we handled the password like that, it was able to run successfully. The full code will be like below:

 #Prompt the user for the source environment username  
 $sourceUserName = "domain\username"  
 # Prompt the user for the source environment password  
 $password = @'  
 My&$P@ssw0rd  
 '@  
 $securePassword = $password | ConvertTo-SecureString -AsPlainText -Force  
 Connect-Site "Site URL" -Username $sourceUserName -Password $securePassword  


References: