Saturday, 1 October 2022

Sync SharePoint 2019 Library to Local Folder

Hi. Recently I needed to implement FBA for a SharePoint 2019 Environment. But before implementing that, I needed to make sure to back up a few libraries from the site, so in case we mess things up, that data shouldn’t be affected. One way was to back up content DB for that web application but it was huge in size. As we require data from a couple of libraries, I thought why not use local folder integration and then copy files to other drives.

Issue

The classic option that worked in SharePoint 2013 of opening the library with file explorer shows enabled but stopped working in SharePoint 2019. It will showcase you a dialog for one drive sync client installation. If you allow the popup, the reference link provided at the end of the blog will open in a new tab.


Solution:
 
You have 2 options showcased on this page:

  • Solution 1 - Install the latest OneDrive client.
They have mentioned all the steps as well.
The issue I faced with this is that you need to login into OneDrive before use which requires Office 365 users. Even after connecting with my trial development account user, I was not able to make it sync to the local folder.

The issue can be anything like we didn’t have any patch installed in the server or the functionality requires both systems to have the same credentials. But as this is not my primary task, we decided to go with the second solution.


  • Solution 2 - Install the OneDrive Sync app
Note – the support for the OneDrive Sync app ended on January 11, 2011. So choose this approach carefully.

To install the previous OneDrive for Business sync app with Office 2013, follow these steps.

Note: If you have Office Professional Plus 2013, Office 365 Enterprise E3, Office 365 Midsize Business, or Office 365 Small Business Premium, then you already have the OneDrive sync app installed.

    • Uninstall any earlier versions of the previous OneDrive for Business sync app.
    • Select one of the installer links below to download the installer for your language and system edition. If the 32-bit or 64-bit edition of Office is already installed, you must select the same edition for OneDrive.


Language

32-bit download link

64-bit download link

Arabic

OneDrive for Business [32-bit]

OneDrive for Business [64-bit]

Bulgarian

OneDrive for Business [32-bit]

OneDrive for Business [64-bit]

Chinese (Simplified)

OneDrive for Business [32-bit]

OneDrive for Business [64-bit]

Chinese (Traditional)

OneDrive for Business [32-bit]

OneDrive for Business [64-bit]

Croatian

OneDrive for Business [32-bit]

OneDrive for Business [64-bit]

Czech

OneDrive for Business [32-bit]

OneDrive for Business [64-bit]

Danish

OneDrive for Business [32-bit]

OneDrive for Business [64-bit]

Dutch

OneDrive for Business [32-bit]

OneDrive for Business [64-bit]

English

OneDrive for Business [32-bit]

OneDrive for Business [64-bit]

Estonian

OneDrive for Business [32-bit]

OneDrive for Business [64-bit]

Finnish

OneDrive for Business [32-bit]

OneDrive for Business [64-bit]

French

OneDrive for Business [32-bit]

OneDrive for Business [64-bit]

German

OneDrive for Business [32-bit]

OneDrive for Business [64-bit]

Greek

OneDrive for Business [32-bit]

OneDrive for Business [64-bit]

Hebrew

OneDrive for Business [32-bit]

OneDrive for Business [64-bit]

Hindi

OneDrive for Business [32-bit]

OneDrive for Business [64-bit]

Hungarian

OneDrive for Business [32-bit]

OneDrive for Business [64-bit]

Indonesian

OneDrive for Business [32-bit]

OneDrive for Business [64-bit]

Italian

OneDrive for Business [32-bit]

OneDrive for Business [64-bit]

Japanese

OneDrive for Business [32-bit]

OneDrive for Business [64-bit]

Kazakh

OneDrive for Business [32-bit]

OneDrive for Business [64-bit]

Korean

OneDrive for Business [32-bit]

OneDrive for Business [64-bit]

Latvian

OneDrive for Business [32-bit]

OneDrive for Business [64-bit]

Lithuanian

OneDrive for Business [32-bit]

OneDrive for Business [64-bit]

Malay(Malaysia)

OneDrive for Business [32-bit]

OneDrive for Business [64-bit]

Norwegian(Bokmal)

OneDrive for Business [32-bit]

OneDrive for Business [64-bit]

Polish

OneDrive for Business [32-bit]

OneDrive for Business [64-bit]

Portuguese(Brazil)

OneDrive for Business [32-bit]

OneDrive for Business [64-bit]

Portuguese(Portugal)

OneDrive for Business [32-bit]

OneDrive for Business [64-bit]

Romanian

OneDrive for Business [32-bit]

OneDrive for Business [64-bit]

Russian

OneDrive for Business [32-bit]

OneDrive for Business [64-bit]

Serbian(Latin)

OneDrive for Business [32-bit]

OneDrive for Business [64-bit]

Slovak

OneDrive for Business [32-bit]

OneDrive for Business [64-bit]

Slovenian

OneDrive for Business [32-bit]

OneDrive for Business [64-bit]

Spanish

OneDrive for Business [32-bit]

OneDrive for Business [64-bit]

Swedish

OneDrive for Business [32-bit]

OneDrive for Business [64-bit]

Thai

OneDrive for Business [32-bit]

OneDrive for Business [64-bit]

Turkish

OneDrive for Business [32-bit]

OneDrive for Business [64-bit]

Ukrainian

OneDrive for Business [32-bit]

OneDrive for Business [64-bit]

Vietnamese

OneDrive for Business [32-bit]

OneDrive for Business [64-bit]

    • Run the downloaded file to start the Setup program.
    • Follow the instructions to complete the installation.
    • If you're asked to provide a license key, enter 3V9N8-W93CC-FQPB8-Y9WVF-TVGJ3.
    • Once the installation is complete, you can open the start menu and in that, you will see the “Microsoft Office 2013” folder. When you open it, you can view OneDrive for Business 2013.


    • When you open it, it will ask you to provide a URL to sync and a path where you can map your local drive folder.


    • Provide the URL and map the correct path and you will be able to sync your files to local folders.


I didn’t have permission to install the new patch on the server but if you do have then try to update the server and check if you can copy files using the OneDrive app in SharePoint 2019 first. If that doesn’t work, you can always perform the steps mentioned in solution 2.


Reference
  • https://docs.microsoft.com/en-us/onedrive/install-previous-sync-app?redirectSourcePath=%252fen-US%252farticle%252fhow-to-install-onedrive-for-business-for-sharepoint-and-sharepoint-online-37b3dddd-30af-4294-aba8-c290cea01b5d

Friday, 16 September 2022

How to create custom create news button in SharePoint Online?

 Recently we were developing a custom news web part using SPFx. The functionality was required the same as the OOTB news web part. The only change was we needed a few more layout options as well we need to showcase a few more column details in the news web part. We build the remaining things as expected but we didn’t have any idea how to provide create a post button as the OOTB news web part provides.

Issue:

So, our first approach was the lazy one. We find out a URL that will create a site page and we will train users to click “Promote as news” once the page is published.
URL – [SiteURL]/_layouts/15/CreateSitePage.aspx

But the issue is, Client didn’t agree to have a 2-click solution.

Solution:

We got a blog from Shantha Kumar (link in description) that provided us an initial idea of the difference between a modern site page and a news post. Microsoft has put a parameter – “Promoted State” to differentiate the page creation.

Promoted State

Page Creation Experience

0 or null

This will create a Modern Site page.

1

This will create a News post in the draft version.

2

This will be the News Post in the published version.


In simple terms, if we hit the below URL, it will create the news post:
[SiteURL]/_layouts/15/CreateSitePage.aspx?promotedstate=1

This solved the first half of the issue. But Microsoft has provided different experiences in news post creation. If you are creating news posts from site pages, it will create posts from a basic template directly. But if you are creating it from the home page or any news post, it will showcase template selection.

The client asked us if it is possible to open that pane with a button click. Here we needed to research some more and ultimately our savior stack exchange has an answer for that. The updated URL will look like the below:

[SiteURL]/_layouts/15/CreatePageFromTemplate.aspx

As the information is scattered and hidden, I thought it would be useful to have this in one place. Hope this helps.  

Reference:

  • https://docs.microsoft.com/en-us/dotnet/api/officedevpnp.core.pages.promotedstate?view=sharepoint-pnpcoreol-3.2.1810
  • https://www.c-sharpcorner.com/blogs/how-the-sharepoint-works-before-creating-news-post-site-page
  • https://sharepoint.stackexchange.com/questions/275598/use-template-for-modern-page-set-page-template-for-the-content-type-site-page

Sunday, 11 September 2022

Visual Studio Code Prettier Extension Set up

Recently I needed to use the Prettier code formatter extension in visual studio code. I thought it would be similar to other extensions. But it is not. We need to set a setting for this extension to work automatically. We will go through that setting for the windows system in this blog.

Prettier Extension Set up

  • Open visual studio code as an administrator.
  • From extensions, install “Prettier – code formatter”


Once you have installed it, you can use it with CTRL + CMD + P (macOS) or CTRL + Shift + P (Windows) to manually format a file or a selection of code

Required Settings

We need to enable format on save settings for this extension. By default, it is disabled in visual studio code, and it is a manual setup.

Also, we need to set the Prettier extension as the default formatter.

Windows Machine set up

In windows, we can follow the below steps for the required settings:
  • Click settings. You will find it in the left bottom corner.


  • Click on Settings in the menu.


  • It will open the settings page. In that, click on the text editor.


  • Scroll down to “Default Formatter” settings.


  • Here, we need to select Prettier.


  • After this from the left menu click on “formatting”.


  • Here, checks the option “Format on save”.


Verify the changes

  • To verify the settings, click on the new text file from the file menu.


  • Click on select a language. Then select – HTML


  • Paste the below code and save the file.

 <html>  
 <head> <title>This is test</title> </head>  
 <body> <p>this is test</p> <p>This is test 2</p> <p>test</p> </body>  
 </html>  

  • When you save the file, it will be automatically formatted.


Final Comments 


With Prettier, the life becomes easy, and code becomes readable. However, be aware that this applies to every project now. If you happen to work on a project with a team where the project does not use Prettier, you will format every file once you save it. If not agreed upon with your teammates, this may cause trouble.

Friday, 12 August 2022

Power Automate URL Changes

 Issue:

Recently I got a query from a citizen developer about a message showing on the Power Automate home page that whether they need to worry about this or not.


Generally, I am not used to reading the warnings posted by Microsoft on the home page of Power Platform applications but as this was a query, I needed to look into it, and I found out that this might not be much worry on the first reading.

Analysis:

As it suggests in the message as well, when you click on the “Learn More” link, you will read similar stuff that Microsoft is changing the URL of Power automate from “https://flow.micrsoft.com” to “https://make.powerautomate.com”.

Also, it is mentioned in the article that once the changes are done, Microsoft will route all the traffic requests to the new URL and users will be redirected to new URL. Though they suggest if they can update their bookmark, it would be useful to change it to a new URL.

Below are the new URL details provided by Microsoft:


#

Existing Power Automate URL

New Power Automate URL

1

*.flow.microsoft.com

*.powerautomate.com

2

flow.microsoft.com

make.powerautomate.com


For US Government Customers

1

gov.flow.microsoft.us

make.gov.powerautomate.us

2

high.flow.microsoft.us

make.high.powerautomate.us

3

flow.appsplatform.us

make.powerautomate.appsplatform.us


For China Customers

1

powerautomate.cn

make.powerautomate.cn


But then I read it twice more to understand the impact on a bigger scale and it is actually a big change. Let’s say you have an IT administrator who has added IP config rules and is not allowing any other URL without prior approval from the network. This would break any flow running because the request would be coming from a new site and would be blocked.

This scenario can happen to Gateway connections especially. As it could be configured to interact with your local cloud.  It will also affect to US Government customers as it has strict URL policies.


So how do you know whether you will be affected by it or not?

There is a paragraph where Microsoft has mentioned that the image in the beginning of the post will be in red color if you are affected. This means you will be facing errors in your flow once the URL change will be implemented.

The following table lists the services to which Power Automate connects. Ensure none of these services are blocked on your network.

Domains

Protocols

Uses

management.azure.com

https

Access to the Azure Resource Manager.

login.microsoft.com
login.windows.net
login.microsoftonline.com
login.live.com
secure.aadcdn.microsoftonline-p.com

https

Access to authentication and authorization endpoints.

graph.microsoft.com

https

Access to Microsoft graph - for getting user information such as a profile photo.

*.azure-apim.net

https

Access to the Runtime for Connectors.

*.flow.microsoft.com

https

Access to the Power Automate site.

*.powerautomate.com

https

Access to Power Automate site.

*.powerapps.com

https

Access to the Power Apps site.

*.azureedge.net

https

Access to the Power Automate CDN.

nps.onyx.azure.net

https

Access to NPS (Net Promoter Score).

webshell.suite.office.com

https

Access to Office for header and search. Please see the Office 365 urls and ranges for more details.

*.dynamics.com

https

Access to Dataverse tables

go.microsoft.com

https

Access to the Power Automate to check for updates

download.microsoft.com

https

Access to the Power Automate to check for updates

login.partner.microsoftonline.cn

https

Access to the Power Automate for desktop cloud discovery


Note

It is not necessary that you see red flags on Power Automate home as per my understanding.  This depends on Microsoft and Your company agreement and if your company has not provided access to your network detection, you may not see this red flag.


For more details, please refer to below link:

·         Power Automate IP address configuration


This change is scheduled for the end of June as per the article. Microsoft has only initiated new sites yet. But once they release the changes, sooner or later they will block the old URL. Before that Microsoft might change the banner's color or shoot an email thread. If you want to be prepared in advance you can perform the check on IP configuration. If you still face the issue, you can always generate a ticket with Microsoft for the same.


Reference:

https://powerautomate.microsoft.com/en-us/blog/flow-microsoft-com-is-moving-to-make-powerautomate-com/

Sunday, 14 November 2021

Set up SharePoint Designer 2013 Step By Step Part 6

 SharePoint Designer 2013 – a tool that is most useful few years back, still handy in some projects, and that still gives me trouble when need to set up for any new machine. So, here is a set up process that I believe can be helpful in future.

Here is order of installation we are going to follow in this article:


If you miss any previous post, you can visit using the above links. 

In this blog we are going to install Update for Microsoft SharePoint Designer 2013 (kb3114721) and verify the working. 


·         Update for Microsoft SharePoint Designer 2013

o   spd2013-kb3114721-fullfile-x64-glb.exe
https://www.microsoft.com/en-us/download/details.aspx?id=53389

o   spd2013-kb3114721-fullfile-x86-glb.exe
https://www.microsoft.com/en-us/download/details.aspx?id=53364

o   Double click on “spd2013-kb3114721-fullfile-x64-glb.exe” file to install the security update.

o   It will open the License agreement dialog. Read the terms and click on “Click here to accept the Microsoft Software License Term”. Once checked, continue button will be enabled. Click on Continue button.


o   It will install the update. It may take few minutes to complete this.

o   Click Ok once completed.


This will complete the full installation of SharePoint Designer 2013 with all the security updates required.

To verify the correct installation, follow below steps:

  • Start SharePoint Designer.
  • Open SharePoint Site where you have SharePoint Designer 2013 Workflow.


  • Provide URL of the site. It will ask you to sign in. Provide credential to login in to site.


  • Go to Workflows tab.


  • It will list OOTB and custom workflows.


  • Open your custom SharePoint 2013 workflow by right clicking on name and then clicking edit workflow.

  • It will open the workflow in edit mode.


Reference –
https://sharepoint.stackexchange.com/questions/218892/error-server-side-activities-have-been-updated-you-need-to-restart-sharepoint-d


Sunday, 7 November 2021

Set up SharePoint Designer 2013 Step By Step Part 5

SharePoint Designer 2013 – a tool that is most useful few years back, still handy in some projects, and that still gives me trouble when need to set up for any new machine. So, here is a set up process that I believe can be helpful in future.

Here is order of installation we are going to follow in this article:


If you miss any previous post, you can visit using the above links. 

In this blog we are going to Update for Microsoft SharePoint Designer 2013.


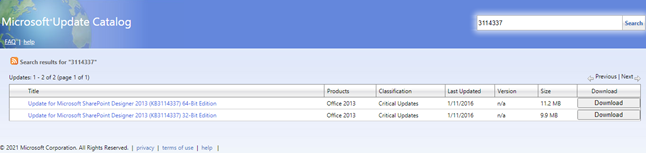
  • Update for Microsoft SharePoint Designer 2013 (kb3114337)
This update is helpful to fix error - Server-side activities have been updated. You need to restart SharePoint Designer to use the updated version of activities.


o   spd2013-kb3114337-fullfile-x64-glb.exe
https://www.catalog.update.microsoft.com/Search.aspx?q=3114337

Direct link - http://download.windowsupdate.com/d/msdownload/update/software/crup/2016/01/spd-x-none_7c1009a5a70cac8d7012a44d2710faf79d7d7fb5.cab

o   spd2013-kb3114337-fullfile-x86-glb.exe
https://www.catalog.update.microsoft.com/Search.aspx?q=3114337

Direct link - http://download.windowsupdate.com/d/msdownload/update/software/crup/2016/01/spd-x-none_54fcb6afdc9f1f8daa26eaa10613902bcb6f3685.cab


o   Extract the .Cab file.

o   Double click on “spd-x-none.msp” file to install update.

o   It will complete the installation within a minute. It will not provide any completion dialog.


SharePoint Server 2016 and 2019 Retirement: What IT Professionals Need to Know

Microsoft SharePoint Server 2016 and 2019 are reaching end of support on July 14, 2026. With the April 2026 feature retirement deadline now ...